Fox Valley Models 50′ Boxcars are a welcome addition to the marketplace, but their ride height leaves quite a bit to be desired. It’s quick and easy to fix that.
This fix applies to the 2011 version of the cars, that includes the run of the cars in Allegheny Midland and Virginian & Ohio schemes, and may not be applicable to other versions of FVM’s cars.
The root of the problem stems from the fact that the cars have (thankfully), body mounted Micro-Trains 1015 couplers. In order for these couplers to fit, there has to be a lot of room between the axle of the wheel set closest to the car’s end, and the floor. This means the car has to ride too high over the rails. Additionally, simply lowering the car will cause the couplers to be too low to properly couple with adjacent cars.
The fix is comprised of three relatively straight forward steps.
- Replacing the trucks – Swapping in a set of BLMA 100 Ton ASF Ride Control Trucks, with their lower bolsters, makes a big difference .
- Modifying the bolsters – This lowers the car.
- Modifying the coupler pockets and mounting – This fixes the coupler height.
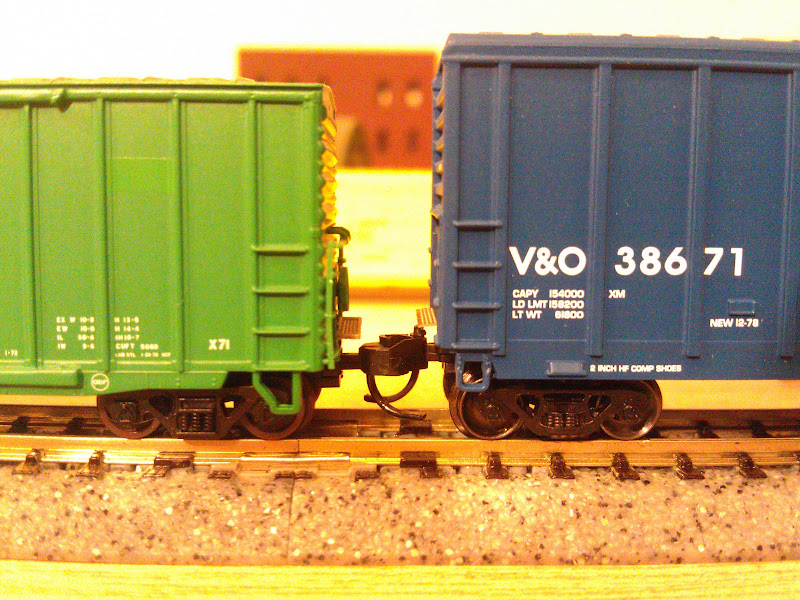
Here’s an illustration of the difference. The car on the left has been modified, the car on the right is stock, as it came out of the box. You can see how the modified car hunkers down over its trucks, while the one on the right looks like it’s waiting for a flood.

Comparison with Atlas Precision Design Boxcar
The Atlas Precision Design boxcar has been my gold standard of boxcar ride heights. Here’s how the FVM car stacks up. The Atlas car is on the left. You can see the huge air gap between the top of the truck and the bottom of the side sill. We’re going to fix that with this process.
Another interesting comparison is to the classic Micro-Trains 50′ Exterior Post boxcar. These have been around for years, and are notorious for their ride height issue. Specifically, the car body rides too high, and as a result was vertically compressed so the car still is still the correct total height from the rails. The V&O car on the left is an unmodified FVM car, while the Saint Mary’s car on the right is an unmodified MTL car.

Swapping The Trucks
Swapping the trucks is really easy. Pull gently on the stock trucks, and they’ll pop off. Keep track of the bolster pins though, they’re surprisingly tough to replace. When it comes time for reassembly, just put the BLMA trucks back on in their place.
This photo shows the general arrangement of the area, once you’ve removed the trucks. Note how the bolsters protrude well above the center sill. We’ll fix that in the next step.

Lowering the Bolster
The first real modifications to the floor are in lowering the bolster “post” that the truck mounts to to be flush, or just a tad higher than the center sill. There are a few easy ways to do this. I’ve done it both with an Xacto knife (the plastic is relatively soft), and using a drill bit that’s larger than the post as a mill. If you’re going to do that, make sure to go slowly, and carefully.

There’s a second part to the step as well. There’s a small air line molded onto the center sill on one end of the car. You need to flatten this to be flush with the sill, otherwise the truck will catch it while rotating. In the photo below you can see where it’s been sliced down with a knife.

Modifying the Coupler Pocket
After the bolsters are shaved down, you need to modify the 1015 coupler pocket so that there’s adequate clearance under it for the axle, and also so that it sits at the correct height to match other equipment. This is done by mounting the “pocket” part of the coupler box (that comes as the “top” of the box upside down and directly to the floor, omitting the “lid” part.
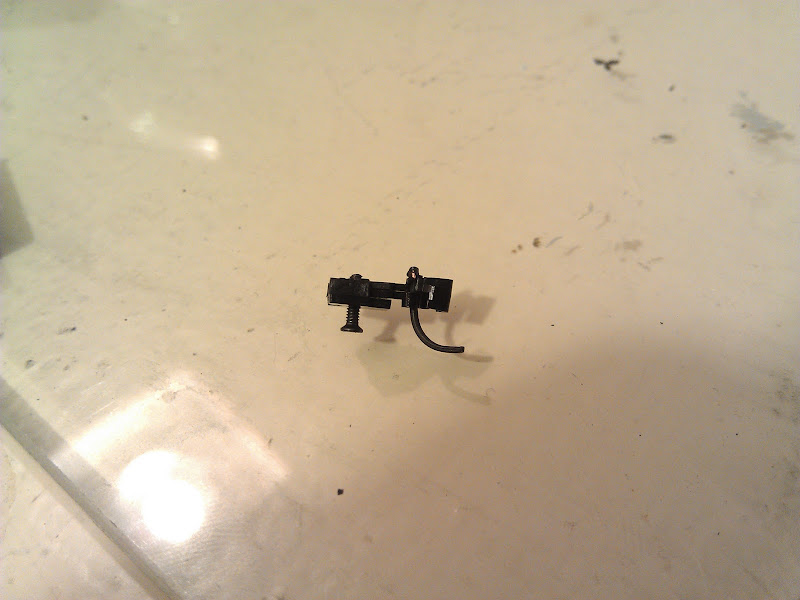
These photos illustrate the way the coupler pocket appears assembled, and then partially unassembled.

In this photo, the “pocket” part is on the right, while the “lid” is on the left.

Be careful disassembling the coupler assembly. The small spring is key. While they’re able to be replaced with ones from any MTL 1015 coupler, there aren’t any spares if you don’t already have them, and losing them will end the project until you’ve found a new one.
Once disassembled, you need to prep the pocket. There are two small “nubs” that get used to locate the lid properly. However, if you don’t remove these, the pocket will not snug up to the floor properly. They can be easily removed with a knife. It’s also helpful at this point to use the knife to create a bit of a countersink for the screw at the mouth of the hole.

With the nubs removed, reassemble the draft gear. The pocket goes on the bottom, with the two halves of the coupler, and the spring. Screw the screw through the pocket so it protrudes just a touch beyond it. This will help get everything lined up when you try reattaching it to the floor. I say try, because this is a very tricky procedure, as the whole thing likes to flop apart. Make sure to keep an eye on that spring!
Now the draft gear is mounted back to the floor. Pop the BLMA trucks on after this step, and snap the floor back into the car’s shell, making sure to line the weights up properly.

The Finished Product
Once you’re done, your cars are noticeably lower, and look significantly better!
Here’s the finished car versus a stock car

And, compared to our gold standard car, we’re looking pretty good!
